Getting started with Qt#
Before you start#
Before we can use the SimpleSwitch™ SDK for Qt (version 6) we need to download the SDK extension. For this you need to run from the sourced SimpleSwitch™ SDK
$ GITHUB_TOKEN="<your personal access token for Github>" GITHUB_USERNAME="<your Github username>" simpleswitch-sdk-tool install qt6
$ eval "$(simpleswitch-sdk-tool activate)"
Github personal access token
To create a Github personal access token see Github container registry (GHCR)
Start a Qt project#
Here is a very small Qt project, with a qmake file helloworld.pro:
# SPDX-FileCopyrightText: (C) 2022 Avnet Embedded GmbH
# SPDX-License-Identifier: LicenseRef-Avnet-OSS-1.0
QT += quick

CONFIG += c++11

# You can make your code fail to compile if it uses deprecated APIs.
# In order to do so, uncomment the following line.
#DEFINES += QT_DISABLE_DEPRECATED_BEFORE=0x060000    # disables all the APIs deprecated before Qt 6.0.0

SOURCES += \
        main.cpp

RESOURCES += qml.qrc

# Additional import path used to resolve QML modules in Qt Creator's code model
QML_IMPORT_PATH =

# Additional import path used to resolve QML modules just for Qt Quick Designer
QML_DESIGNER_IMPORT_PATH =

# Default rules for deployment.
qnx: target.path = /tmp/$${TARGET}/bin
else: unix:!android: target.path = /opt/$${TARGET}/bin
!isEmpty(target.path): INSTALLS += target
A code source file, main.cpp:
// SPDX-FileCopyrightText: (C) 2022 Avnet Embedded GmbH
// SPDX-License-Identifier: LicenseRef-Avnet-OSS-1.0
#include <QGuiApplication>
#include <QQmlApplicationEngine>

int main(int argc, char *argv[])
{
#if QT_VERSION < QT_VERSION_CHECK(6, 0, 0)
    QCoreApplication::setAttribute(Qt::AA_EnableHighDpiScaling);
#endif

    QGuiApplication app(argc, argv);

    QQmlApplicationEngine engine;
    const QUrl url(QStringLiteral("qrc:/main.qml"));
    QObject::connect(&engine, &QQmlApplicationEngine::objectCreated,
                     &app, [url](QObject *obj, const QUrl &objUrl) {
        if (!obj && url == objUrl)
            QCoreApplication::exit(-1);
    }, Qt::QueuedConnection);
    engine.load(url);

    return app.exec();
}
A qml.qrc file:
<!--SPDX-FileCopyrightText: (C) 2022 Avnet Embedded GmbH-->
<!--SPDX-License-Identifier: LicenseRef-Avnet-OSS-1.0-->
<RCC>
    <qresource prefix="/">
        <file>main.qml</file>
    </qresource>
</RCC>
And a main.qml file:
// SPDX-FileCopyrightText: (C) 2022 Avnet Embedded GmbH
// SPDX-License-Identifier: LicenseRef-Avnet-OSS-1.0
import QtQuick 2.12
import QtQuick.Window 2.12

Window {
    width: 640
    height: 480
    visible: true
    title: qsTr("Hello World")

    Rectangle {
        id: page
        width: 640; height: 480
        color: "lightgray"

        Text {
            id: helloText
            text: "Hello world!"
            y: 30
            anchors.horizontalCenter: page.horizontalCenter
            font.pointSize: 24; font.bold: true
        }
    }
}
Create a directory
$ mkdir -p helloworld/helloworld
And put these files in this directory.
Using Qt with a Makefile#
Using the qmake file, building a SimpleSwitch™ package can be done by sourcing
the SDK environment and running the simpleswitch-generate-package script
$ . /opt/sc/0.1.0/sm2s-imx8plus/environment-setup-cortexa53-crypto-simplecoredistro-linux
$ cd helloworld
$ mkdir build
$ qmake -o build helloworld
$ simpleswitch-generate-package --name helloworld --work-dir simpleswitch --makefile-dir build \
   --template qt6 --startup-command /opt/helloworld/bin/helloworld
Flash and debug on device a Qt application#
If you want to debug the application using GDB just replace the previous
qmake and simpleswitch-generate-package instructions by the following
ones
$ qmake -o build helloworld CONFIG+=debug CONFIG+=qml_debug CONFIG-=separate_debug_info
$ simpleswitch-generate-package --name helloworld --work-dir simpleswitch --makefile-dir build \
   --template qt6 --startup-command "gdbserver :2159 /opt/helloworld/bin/helloworld"
Deploy to the target#
Now it is time to deploy the generated SimpleSwitch™ container to the device. For this please see Deploy a SimpleSwitch™ package
Using Qt Creator#
The Yocto SDK environment must be sourced when starting Qt Creator. So, you can start the application thanks to a terminal doing
$ . /opt/sc/0.1.0/sm2s-imx8plus/environment-setup-cortexa53-crypto-simplecoredistro-linux
$ qtcreator
Then the first time you want to use the Yocto SDK you will have to add a new development kit for your device adding:
a device
a development kit using:
a Qt version
a compiler
a debugger
a CMake
In order to add that it is possible to use qtcreator-kit-configurator or
to do it manually.
Then the project must be configured to use that new kit, and to use
SimpleSwitch™ commands to build, deploy and run the application. It is
possible to configure the project using qtcreator-project-configurator.
Adding kit and device using the script#
The script to add a new device and kit is qtcreator-kit-configurator.
With that tools three arguments should be used:
-ato choose the address IP of the device.-cto select the path to the QtCreator configuration directory.-nto choose the name of the new kit.
So for example if:
you had installed QtCreator from the Ubuntu deb package, the configuration path should be
~/.config/QtProject/qtcreator/.the IP address of the target is
192.168.0.46the SDK is made for an
sm2s-imx8plus
You could just do:
$ qtcreator-kit-configurator -a 192.168.0.46 -c ~/.config/QtProject/qtcreator/ -n sm2s-imx8plus-kit
Adding kit and device manually#
Depending on your Qt Creator version, the tabs could not be organized exactly the same way as in the following documentation.
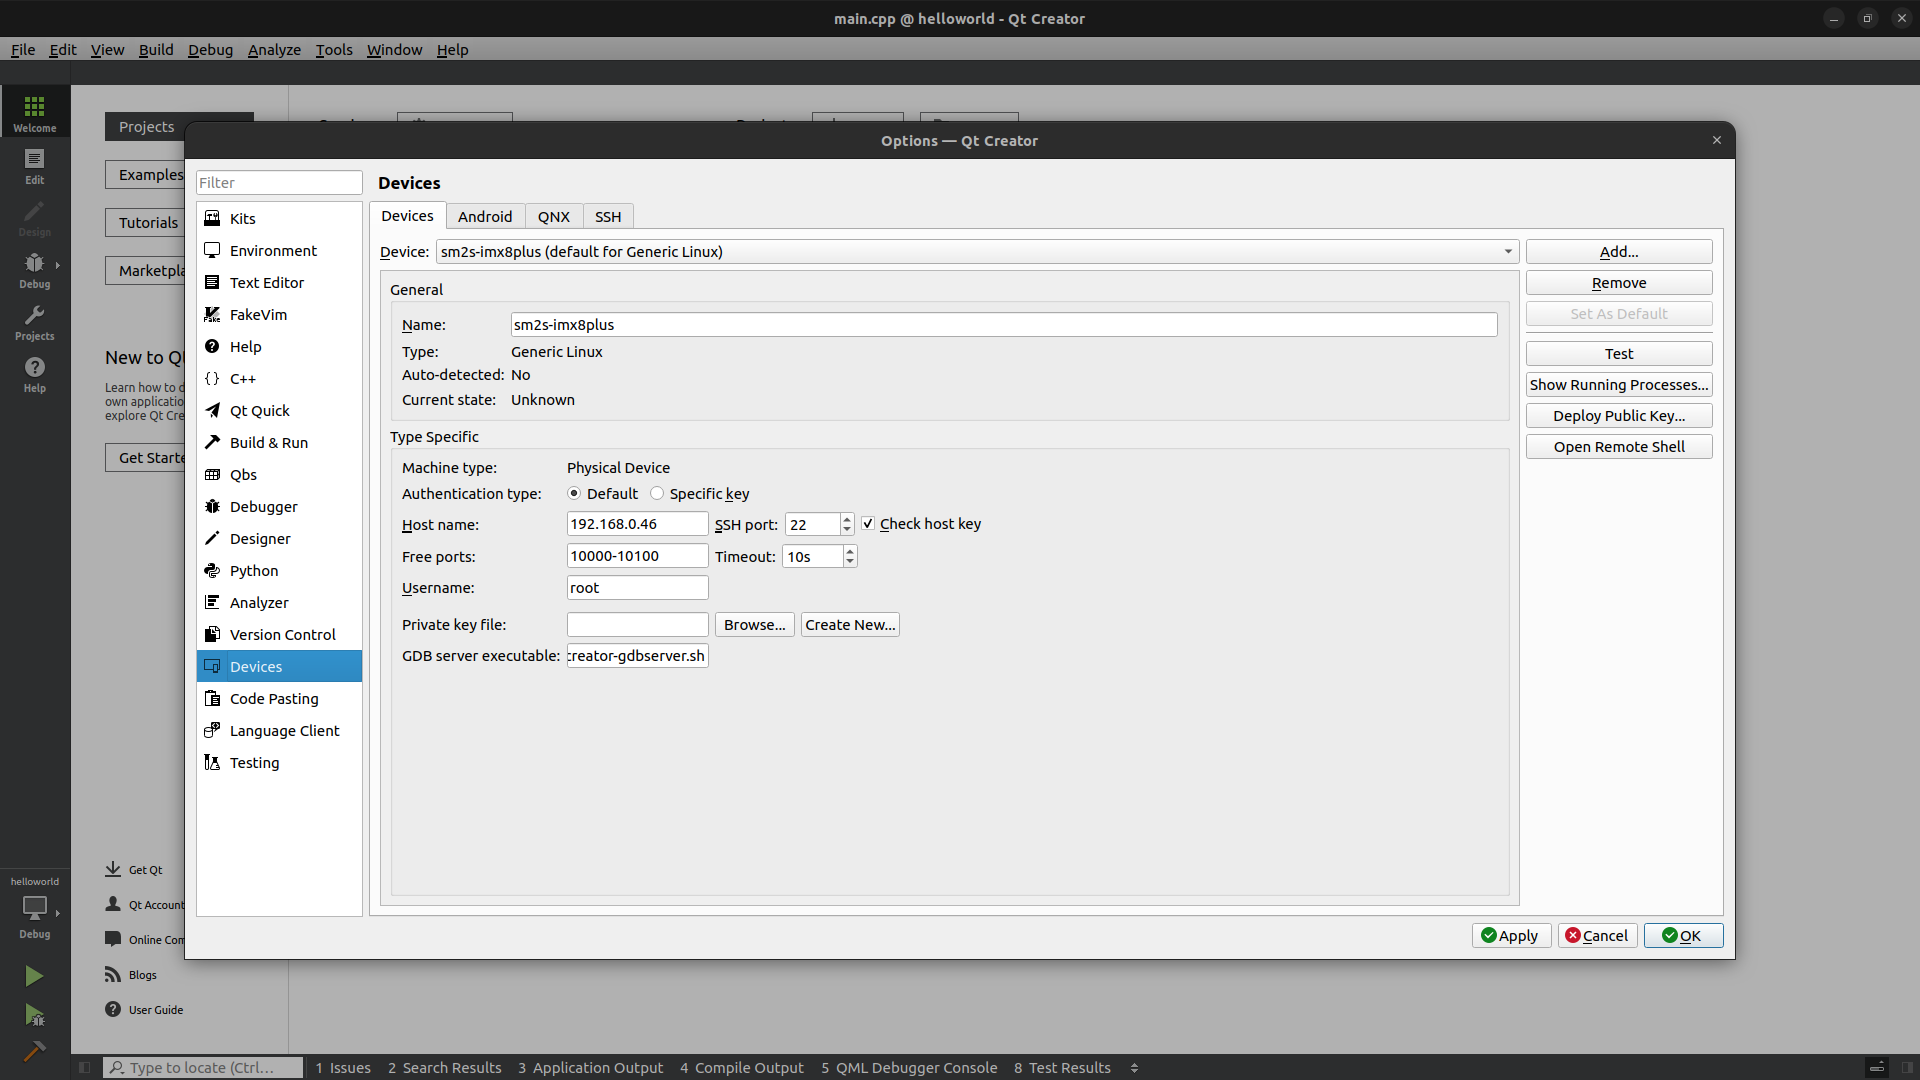
Add a device#
Click on the
Toolsmenu thenOptions....Select
Devicesin the left panel.Click on
Add, chooseGeneric Linux Device, then click onStart Wizard.Enter a name for your device, the IP address of the board, and use
rootasusername.Continue and check that the
Device Testis able to connect to your board.Finally add in
GDB server executablethe value/tmp/qtcreator-gdbserver.sh. This script will be created during the deployment bysimpleswitch-update-qtcreator-gdbserver.
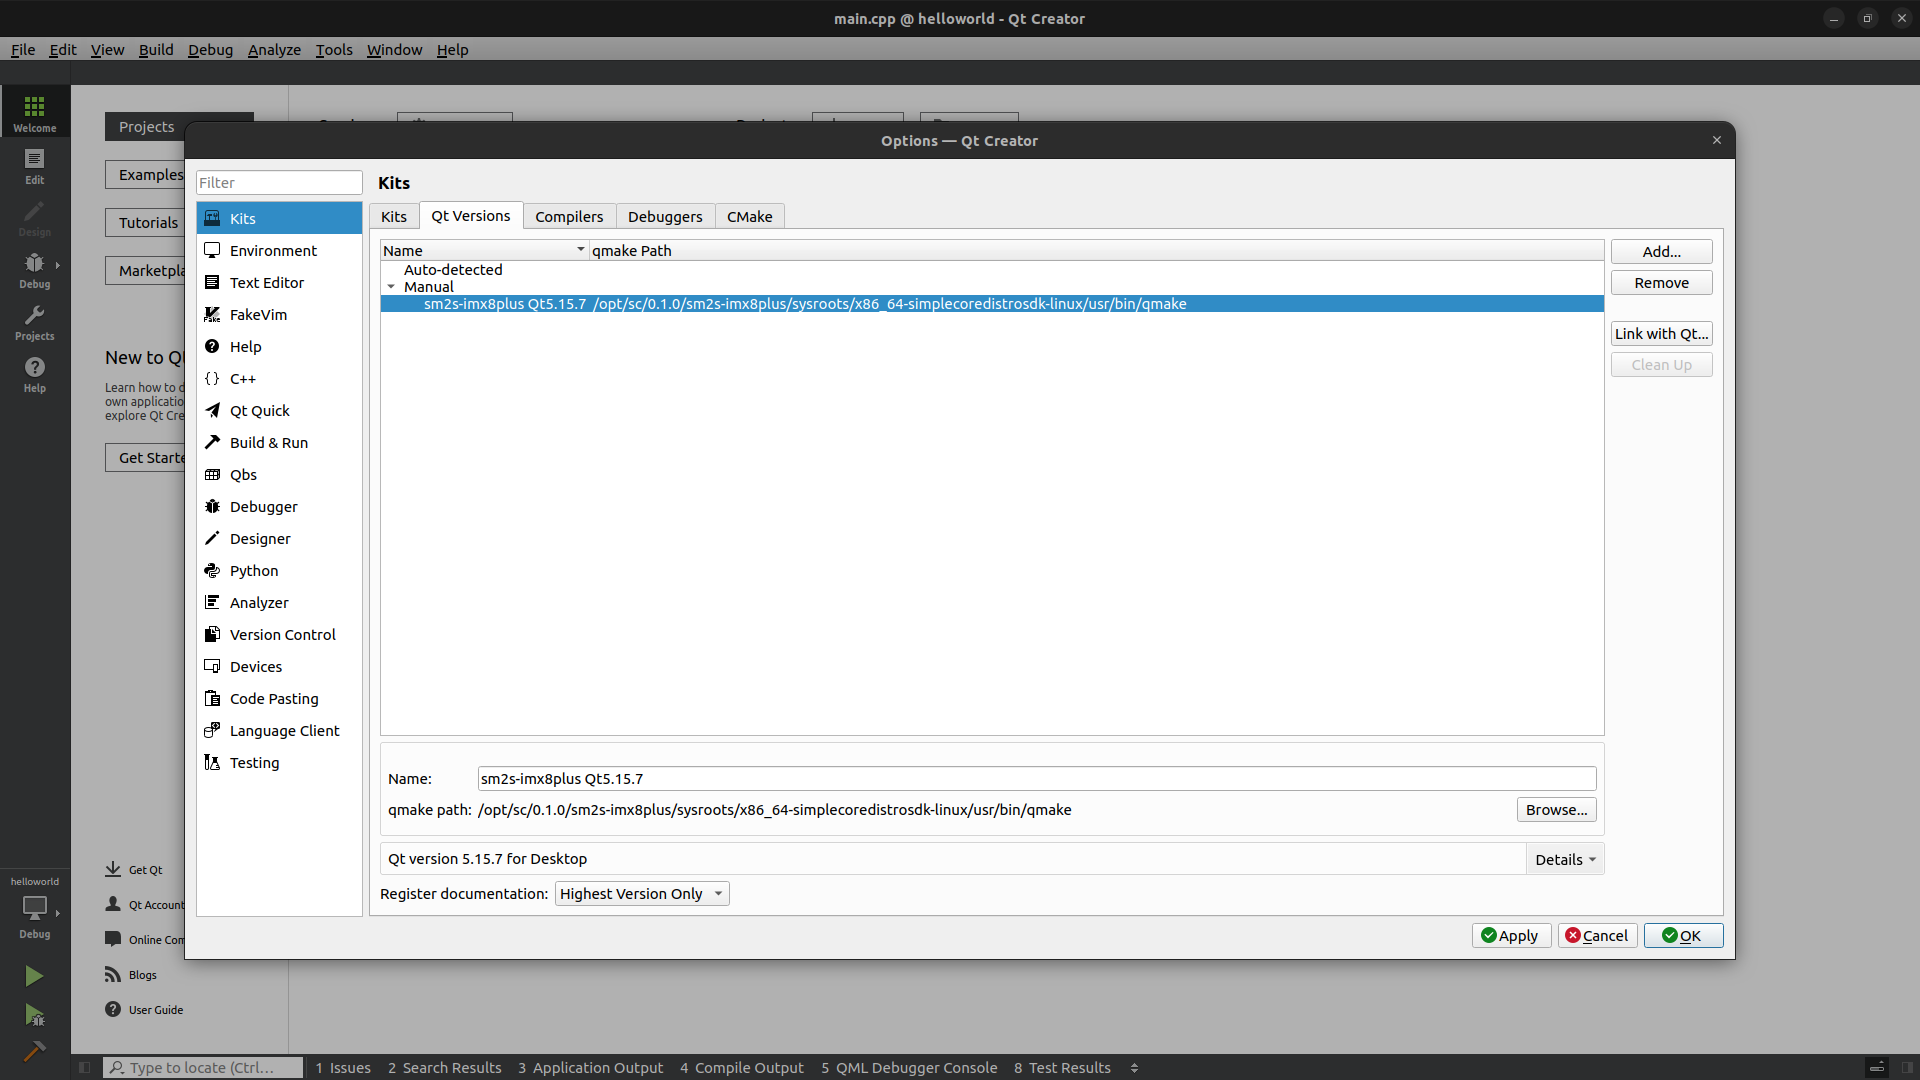
Add a Qt version#
Click on the
Toolsmenu thenOptions....Select
Kitsin the left panel.Click on
Qt Versionstab.Click on
Addand browse to find the qmake executable found in the Yocto SDK. If you didn’t change the default installation path it should be:
$ /opt/sc/0.1.0/sm2s-imx8plus/sysroots/x86_64-simplecoredistrosdk-linux/usr/bin/qmake
Adapt the name of the version.
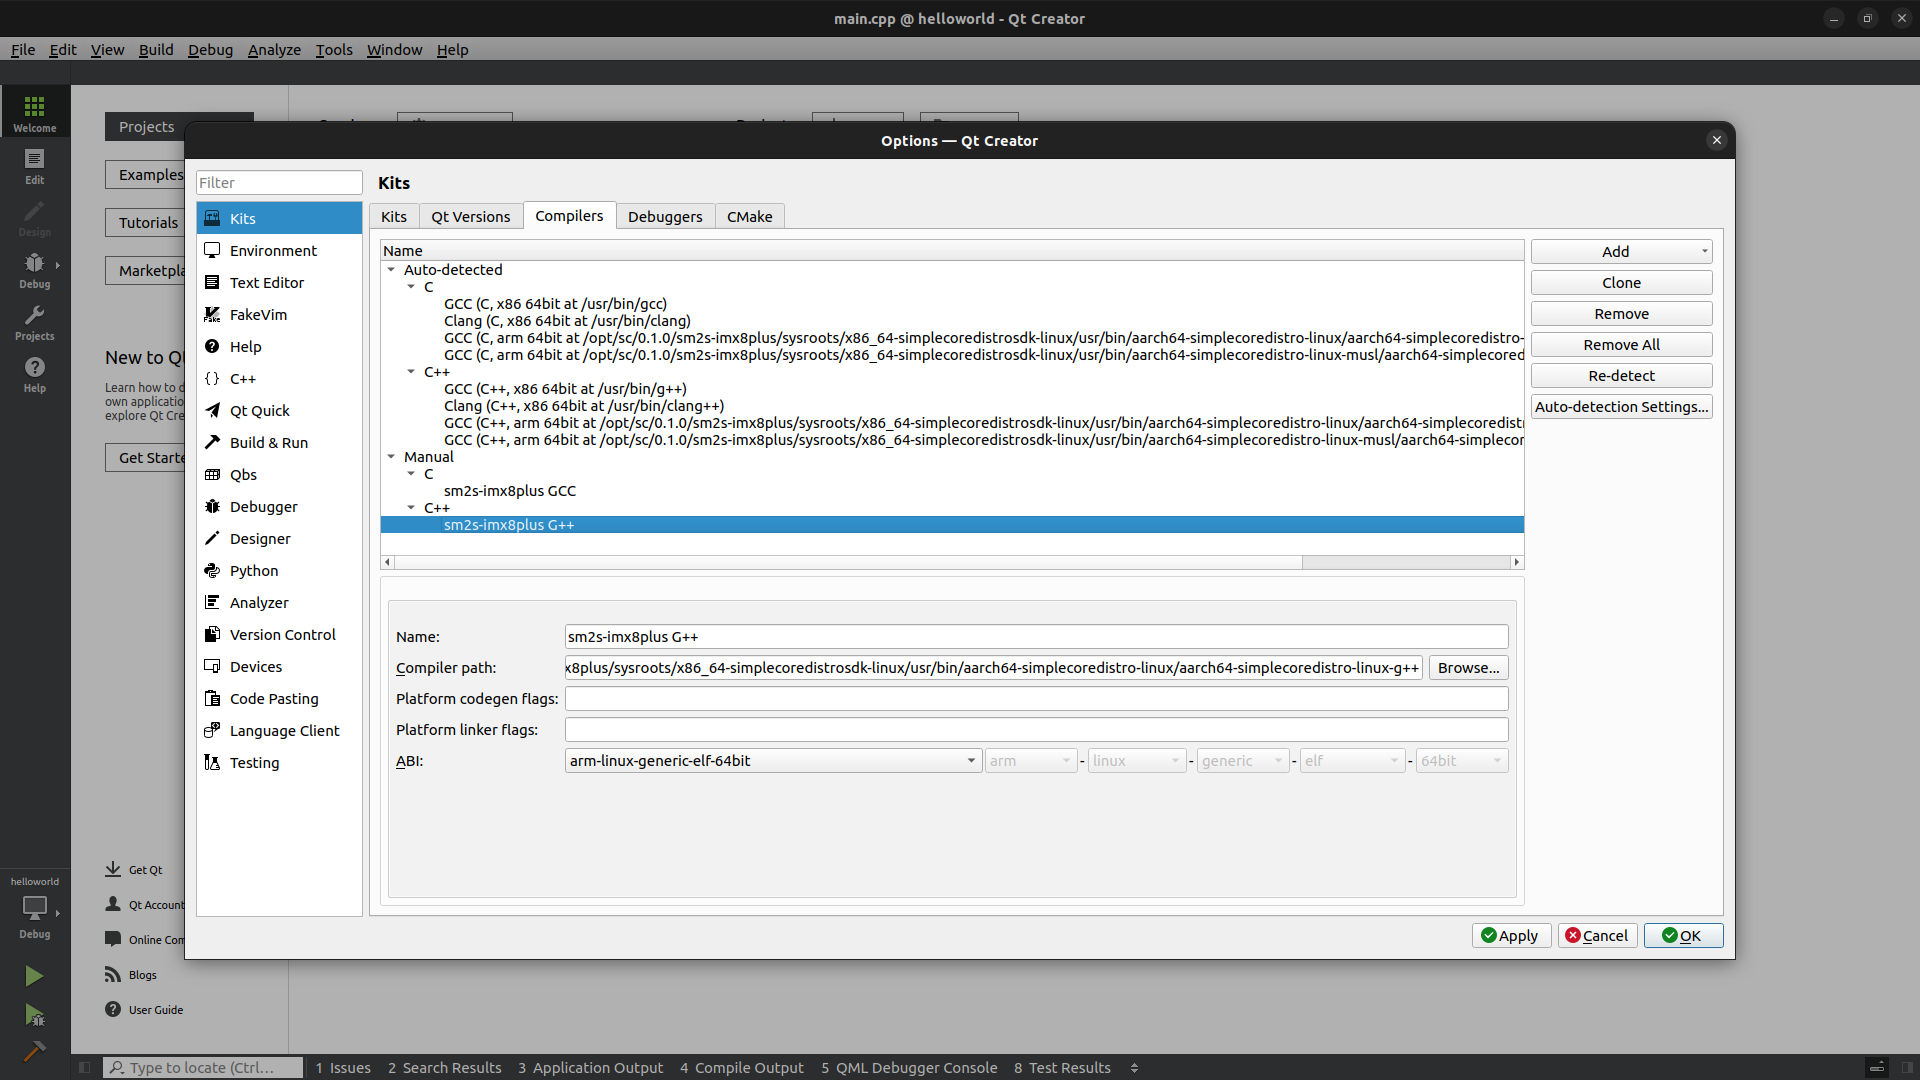
Add a Compiler#
Click on the
Toolsmenu thenOptions....Select
Kitsin the left panel.Click on
Compilerstab.Click on
Add, then chooseGCCand finally chooseC.Adapt the name of the compiler.
Browse to find the gcc executable found in the Yocto SDK. If you didn’t change the default installation path it should be:
$ /opt/sc/0.1.0/sm2s-imx8plus/sysroots/x86_64-simplecoredistrosdk-linux/usr/bin/aarch64-simplecoredistro-linux/aarch64-simplecoredistro-linux-gcc
Repeat the process adding a
GCCcompiler for theC++choosing:
$ /opt/sc/0.1.0/sm2s-imx8plus/sysroots/x86_64-simplecoredistrosdk-linux/usr/bin/aarch64-simplecoredistro-linux/aarch64-simplecoredistro-linux-g++
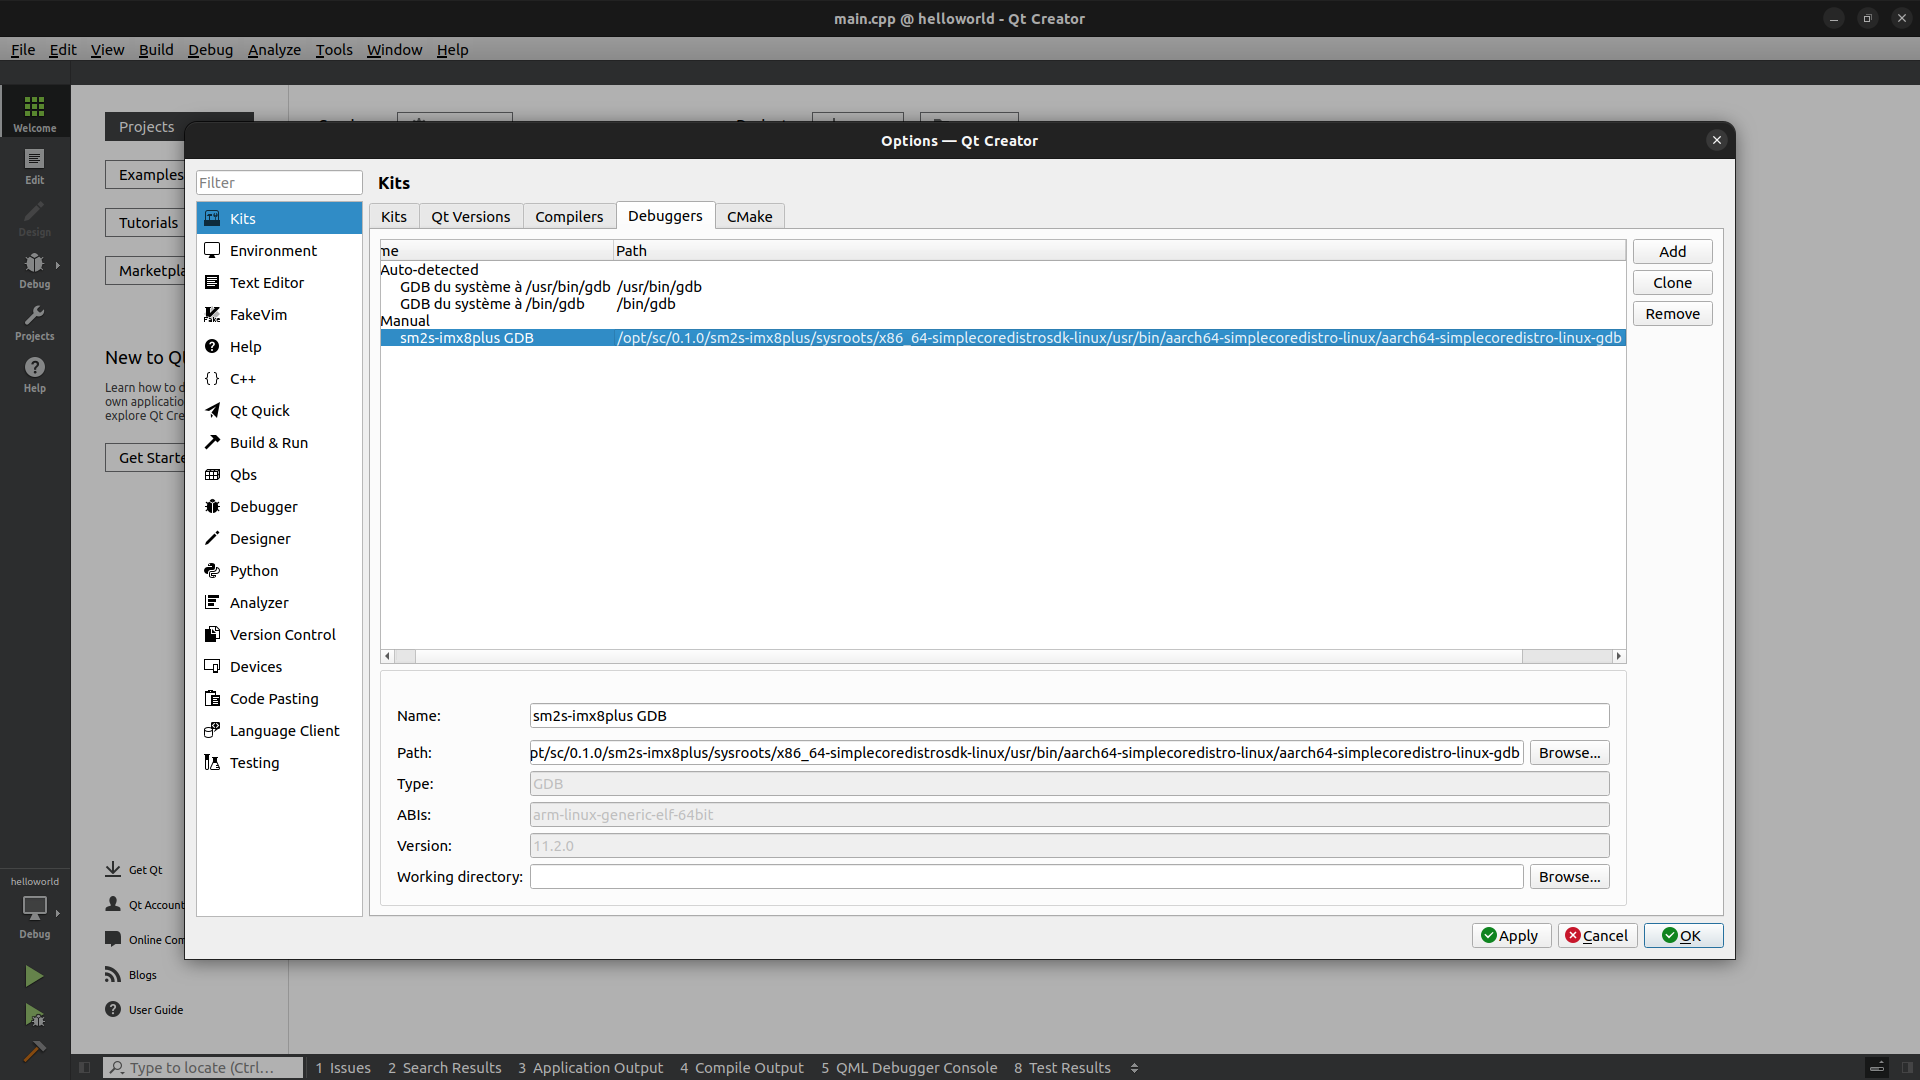
Add a Debugger#
Click on the
Toolsmenu thenOptions....Select
Kitsin the left panel.Click on
Debuggerstab.Click on
Add.Adapt the name of the debugger.
Browse to find the gdb executable found in the Yocto SDK. If you didn’t change the default installation path it should be:
$ /opt/sc/0.1.0/sm2s-imx8plus/sysroots/x86_64-simplecoredistrosdk-linux/usr/bin/aarch64-simplecoredistro-linux/aarch64-simplecoredistro-linux-gdb
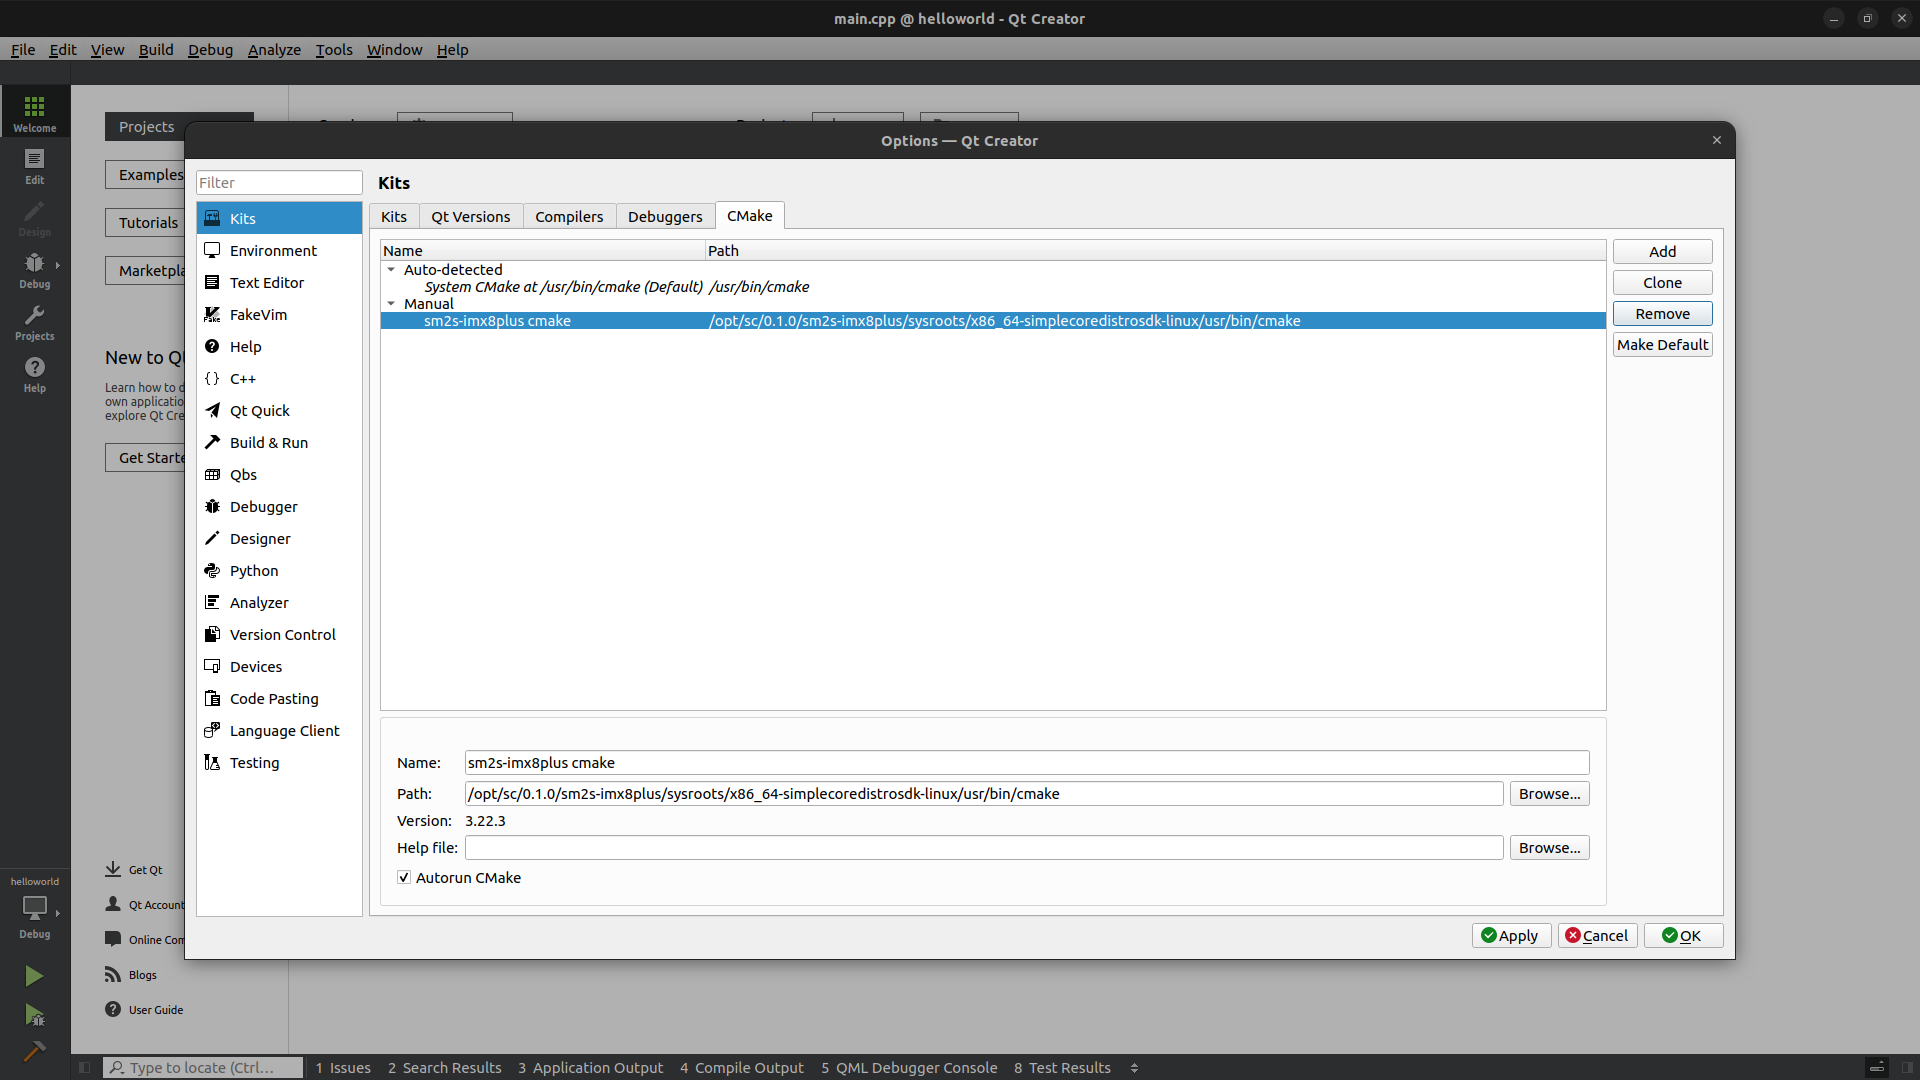
Add CMake#
Click on the
Toolsmenu thenOptions....Select
Kitsin the left panel.Click on
CMaketab.Click on
Add.Adapt the name of the CMake.
Browse to find the CMake executable found in the Yocto SDK. If you didn’t change the default installation path it should be:
$ /opt/sc/0.1.0/sm2s-imx8plus/sysroots/x86_64-simplecoredistrosdk-linux/usr/bin/cmake
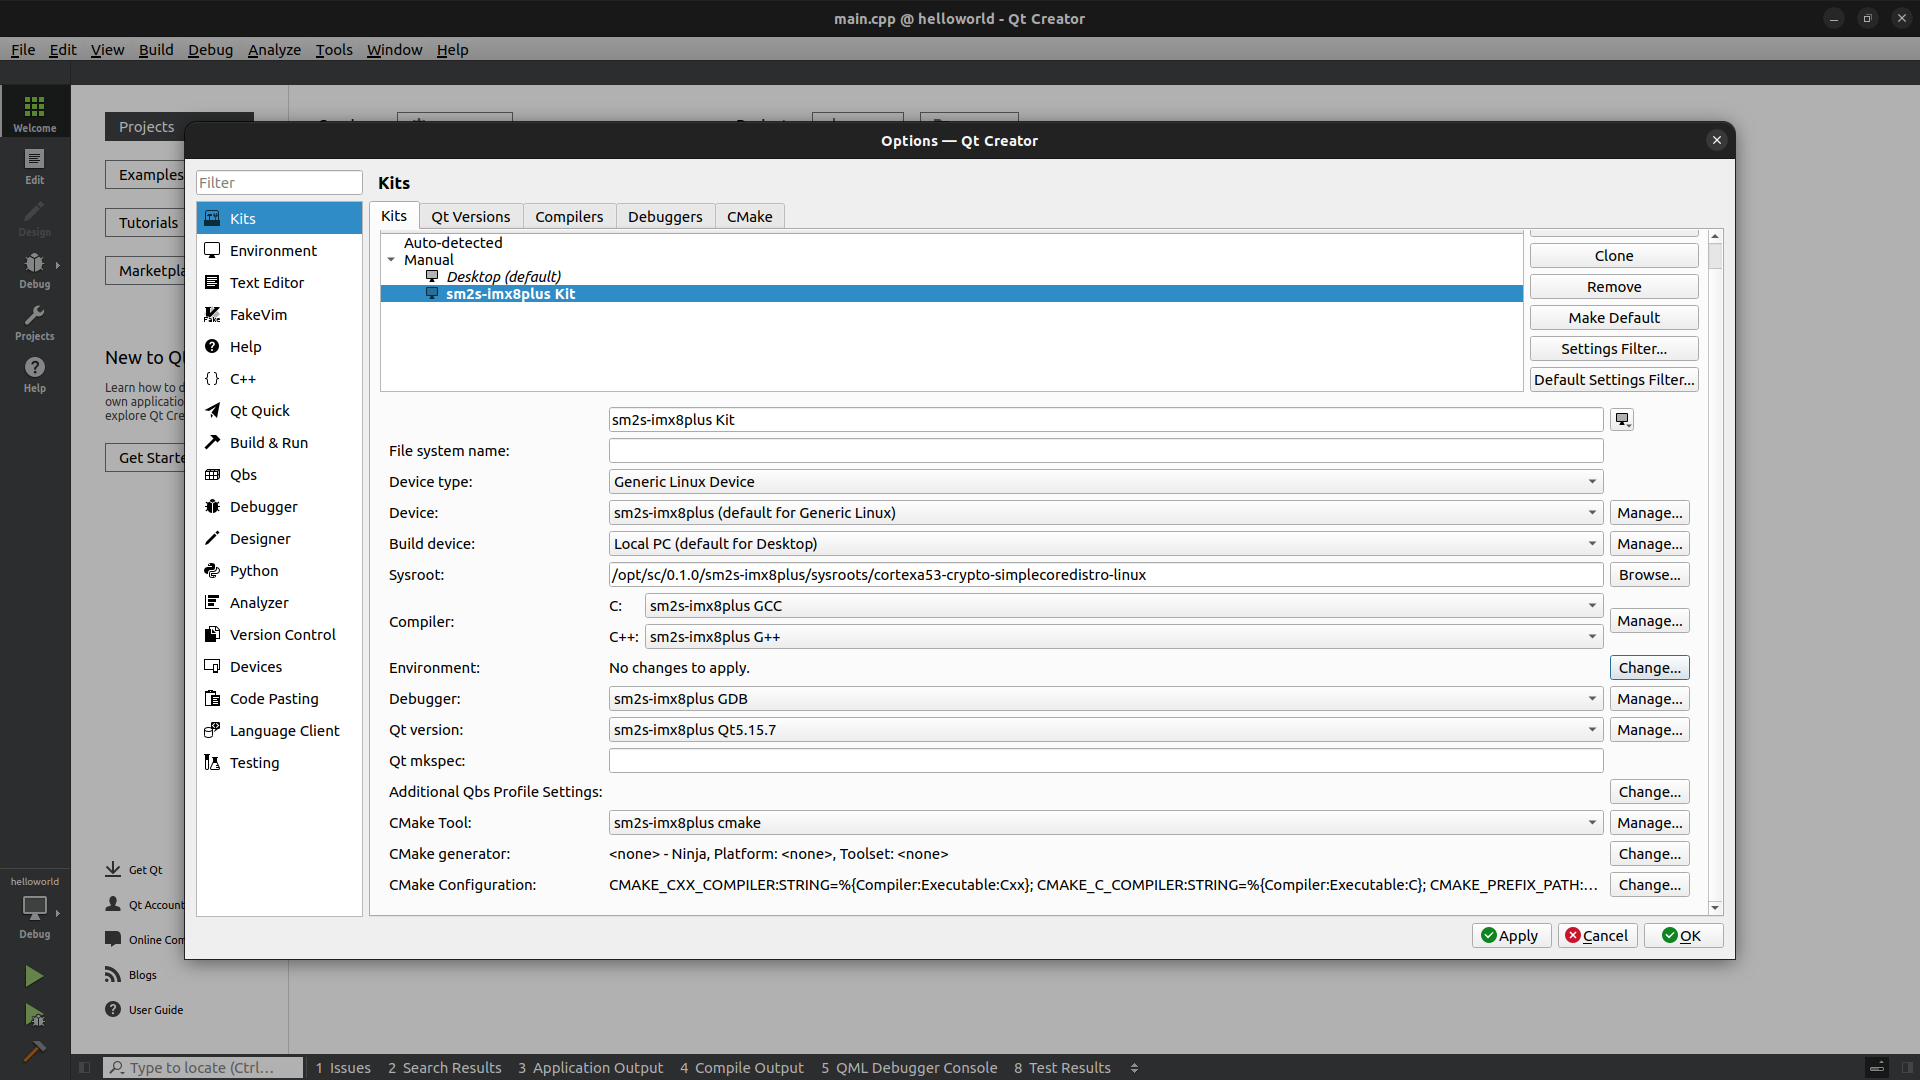
Add a Kit#
Click on the
Toolsmenu thenOptions....Select
Kitsin the left panel.Click on
Kitstab.Click on
Add.Adapt the name of the Kit.
As
Device typechooseGeneric Linux DeviceAs
Device,Compiler,Debugger,Qt versionandCMake Toolchoose the ones you created previously.As
Sysrootbrowse to find the sysroot of the target in the Yocto SDK. If you didn’t change the default installation path it should be:
$ /opt/sc/0.1.0/sm2s-imx8plus/sysroots/cortexa53-crypto-simplecoredistro-linux/
As
Qt mkspecadd the mkspec of the target in the Yocto SDK. If you didn’t change the default installation path it should be:
$ /opt/sc/0.1.0/sm2s-imx8plus/sysroots/cortexa53-crypto-simplecoredistro-linux/usr/lib/mkspecs/linux-oe-g++
Configure the project using the script#
The script to configure the project is qtcreator-project-configurator.
With that script, 2 arguments are mandatory:
-nto choose the kit name for which the script will configure the project.-pto choose the path to the project configuration file (thepro.userone).
For example if:
the Qt kit is called
sm2s-imx8plus-kitthe path to the project configuration file is
~/helloworld/helloworld/helloworld.pro.user(file which should have been created the first time you open the project with QtCreator).
You could do:
Open the project created using the Qtcreator menu
File, thenOpen File or Project...and browsing to the.profile created previously.Make sure the Yocto toolchain kit is activated in the
Build & Runsection.Close Qtcreator
Run the following command:
$ qtcreator-project-configurator -n sm2s-imx8plus-kit -p ~/helloworld/helloworld/helloworld.pro.user
Configure the project manually#
Open the project created using the menu
File, thenOpen File or Project...and browsing to the.profile created previously.Select the
Projectsconfiguration tab (on the left of the screen).Make sure the Yocto toolchain kit is activated in the
Build & Runsection and is configured to run on the device you added (Run/Runsection)In the
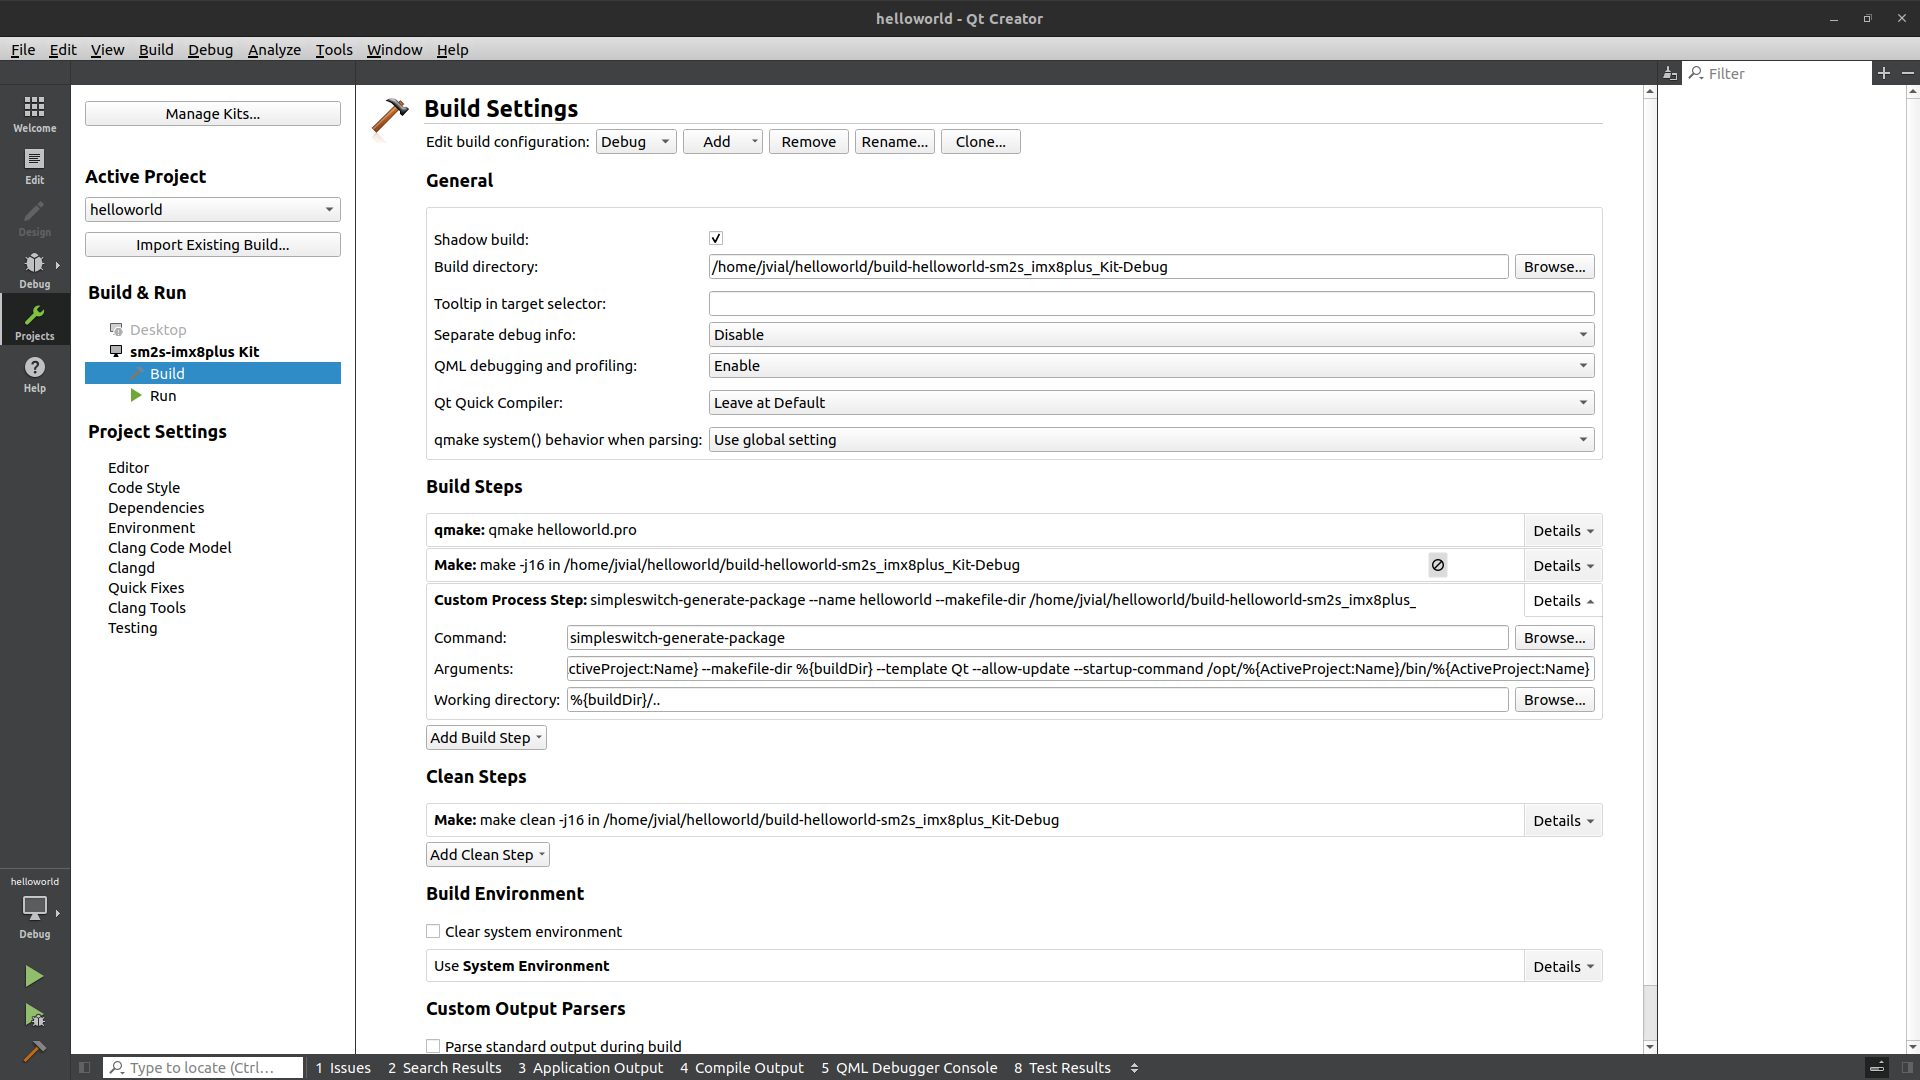
Build/Build Stepssection, disableMakestep (DON’T remove it).In this same section, add a new
Custom Process Stepsto create the SimpleSwitch™ package:Command:
simpleswitch-generate-packageArguments:
--name %{ActiveProject:Name} --makefile-dir %{buildDir}
--template qt6 --allow-update --startup-command
/opt/%{ActiveProject:Name}/bin/%{ActiveProject:Name}
Working directory:
%{buildDir}/..
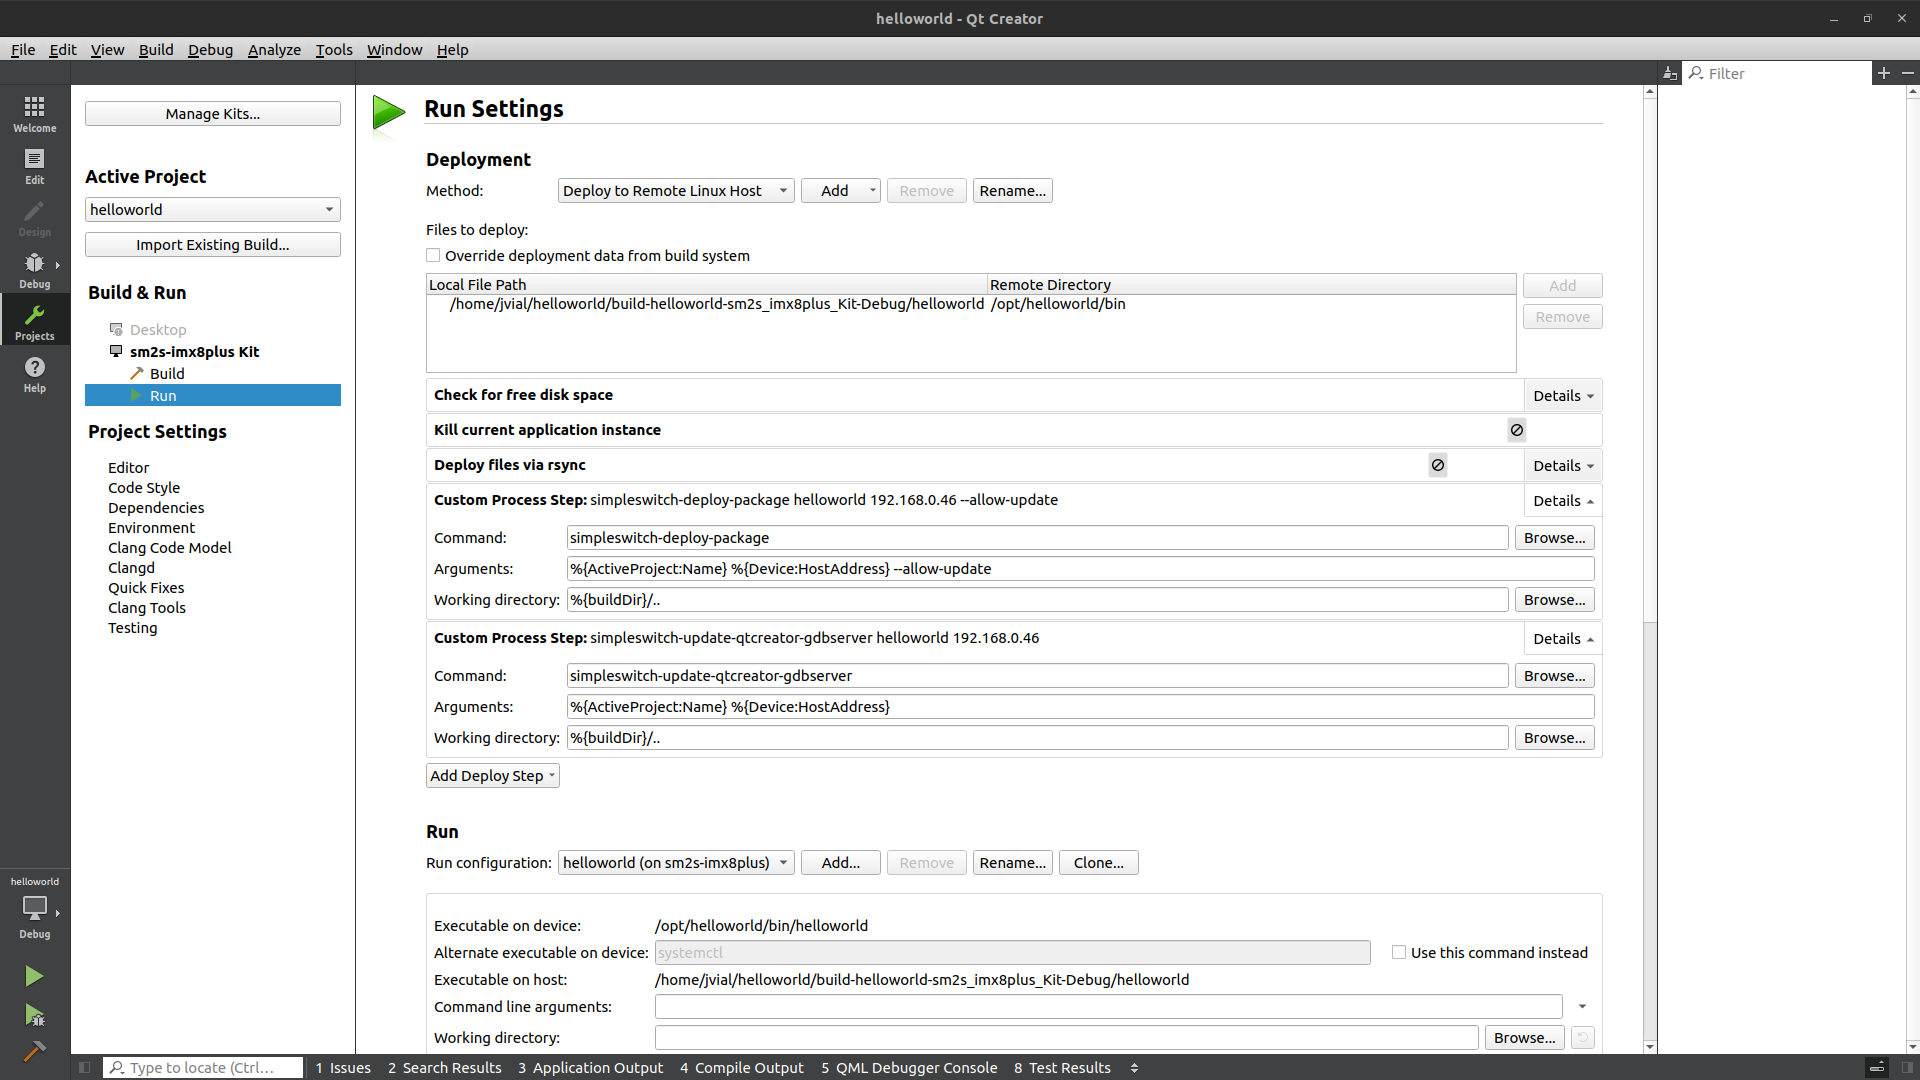
In the
Run/Deploymentsection, disable or remove theKill current application instanceand theDeploy files via rsyncsteps.In this same section, add a new
Custom Process Stepsto deploy the SimpleSwitch™ package:Command:
simpleswitch-deploy-packageArguments:
%{ActiveProject:Name} %{Device:HostAddress} --allow-updateWorking directory:
%{buildDir}/..
And add another
Custom Process Stepsto update the GDB helper script used during debug. As QtCreator only allows to set a single GDB server path for all projects, this script needs to be updated on each deploy:Command:
simpleswitch-update-qtcreator-gdbserverArguments:
%{ActiveProject:Name} %{Device:HostAddress}Working directory:
%{buildDir}/..
In the
Run/Runsection, you will need to set two configurations. First of all,Clone...the default run configuration in order to create the first one which will be used for debugging.
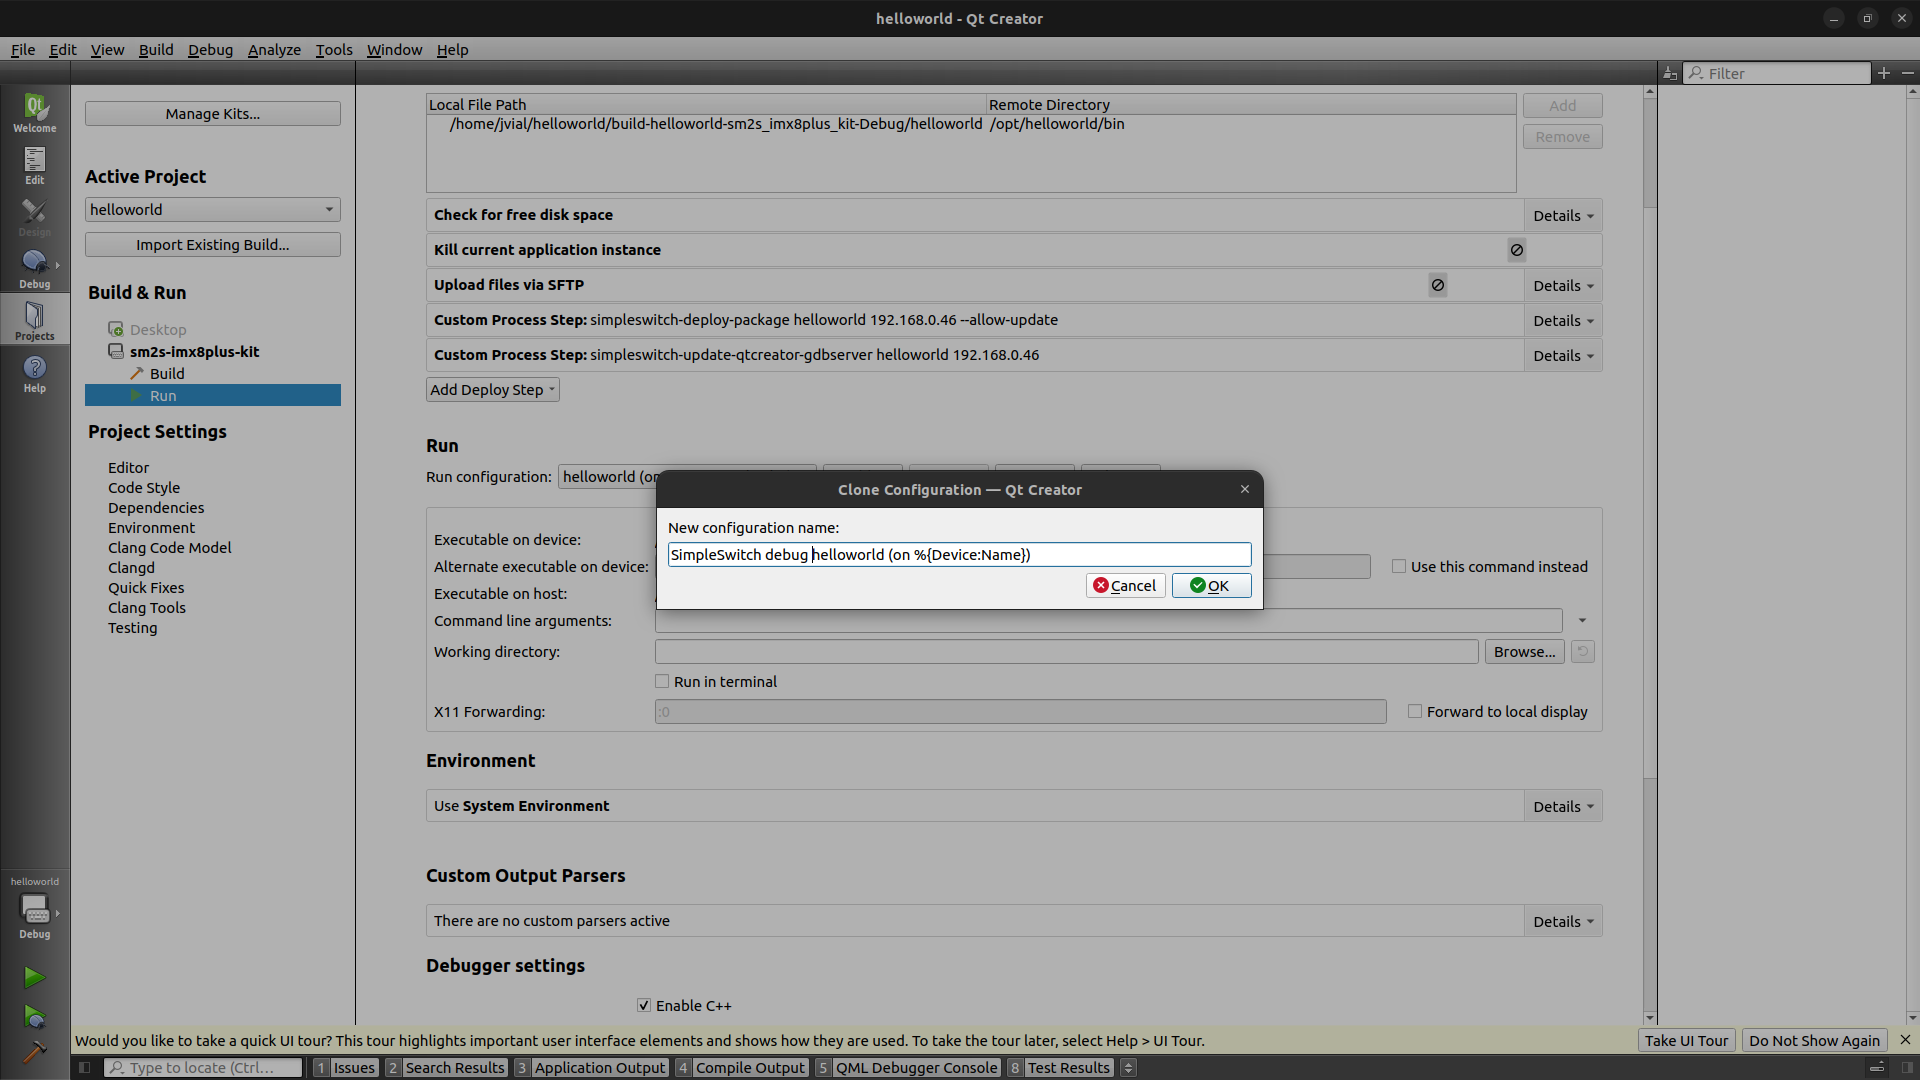
Modify the newly run configuration to add the following environment variables in
Run/Environmentsection.QT_QPA_PLATFORMmust be set towayland.XDG_RUNTIME_DIRmust be set to the path set on target,/run/user/0.

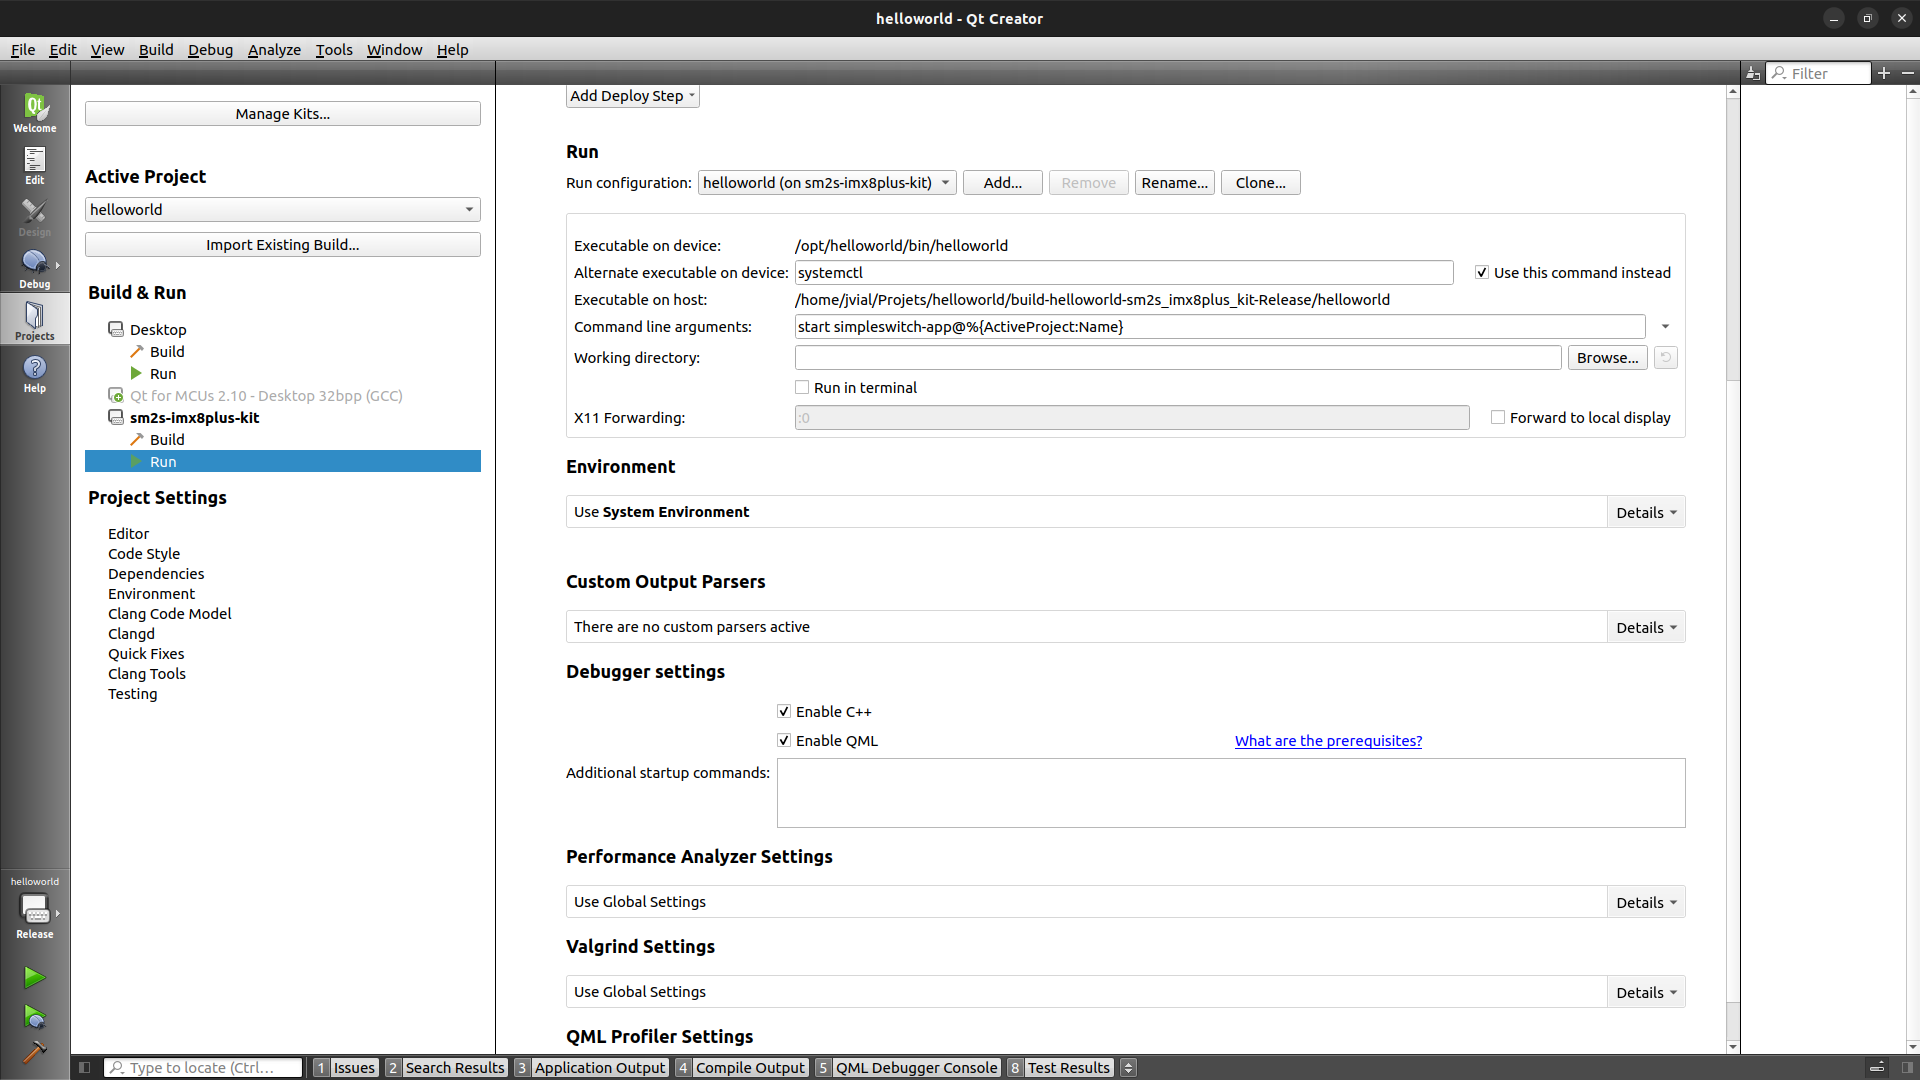
The second one will be used when running the application. Switch back to the default run configuration and again click on
Clone...
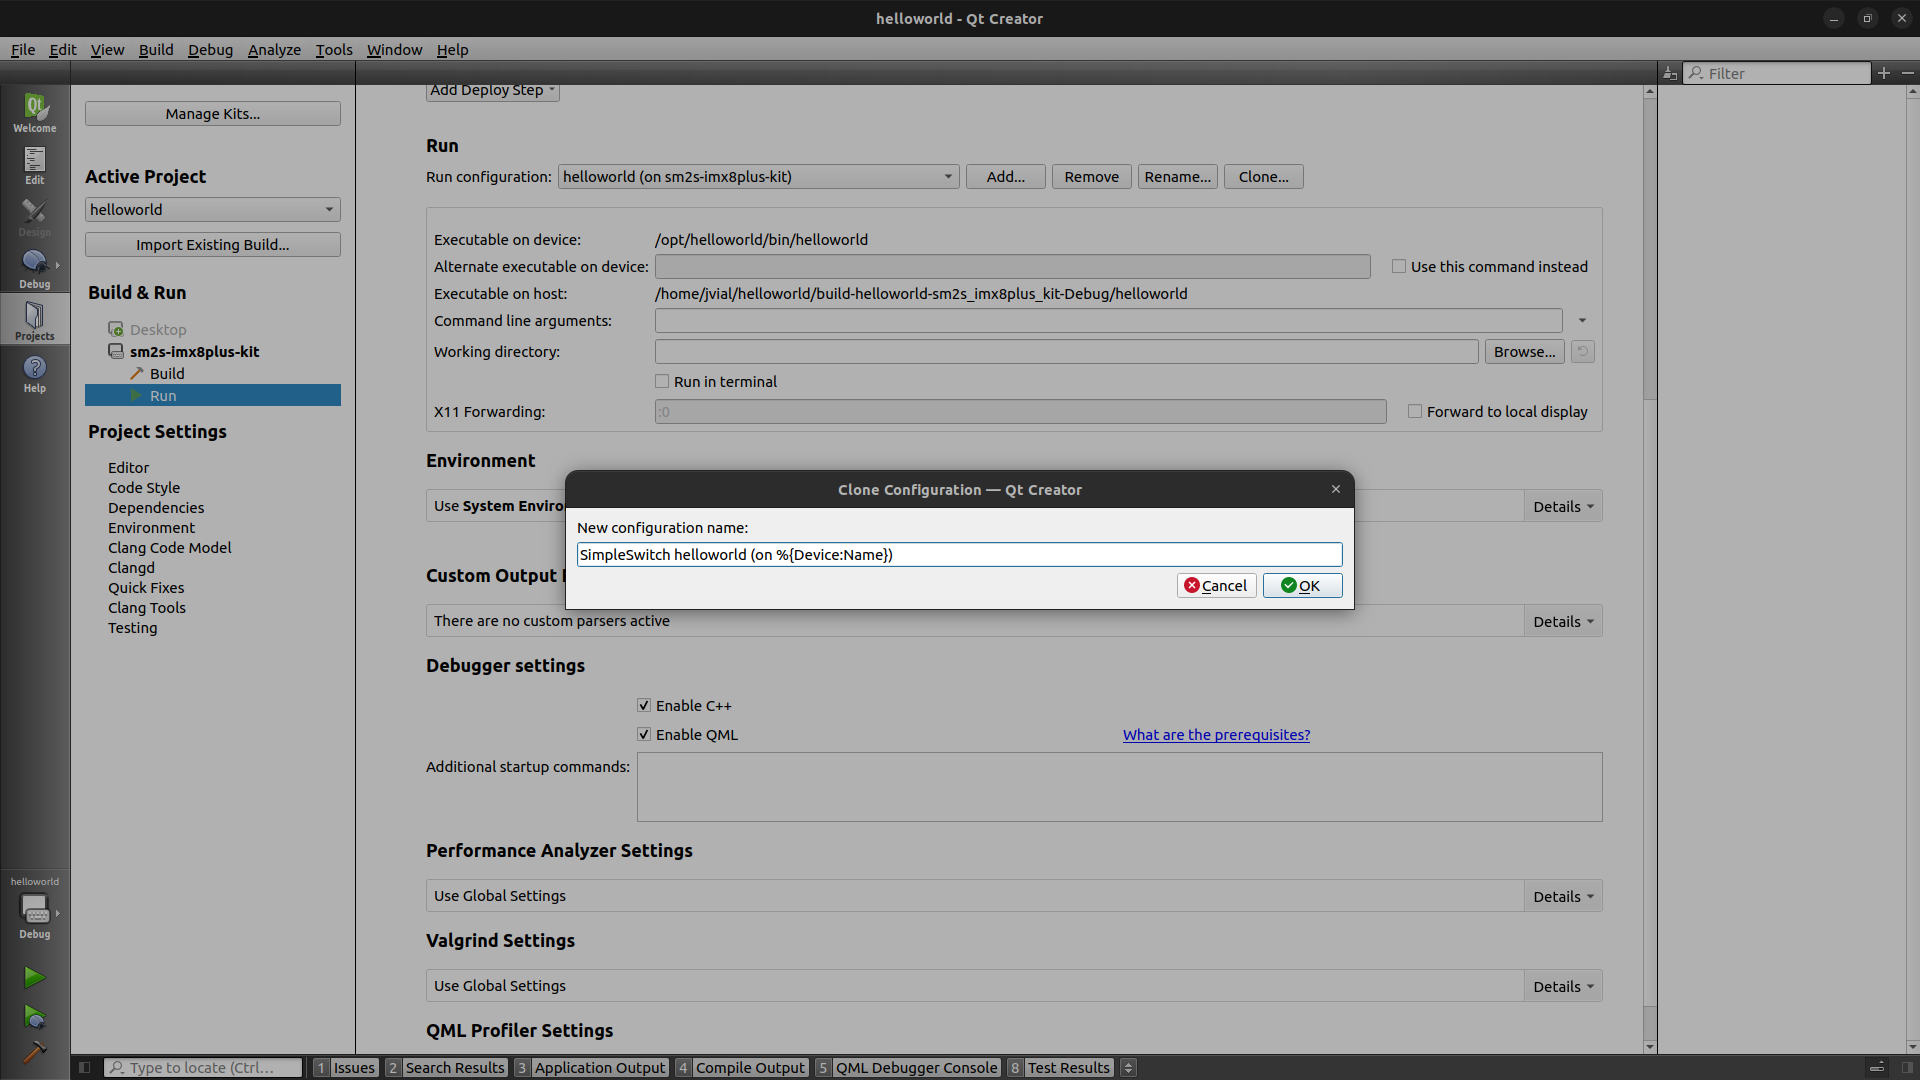
Modified this new run configuration to set:
Alternate exectuable on devicetosystemctlwithUse this command insteadselected.Command line argumentstostart simpleswitch-app@%{ActiveProject:Name}.
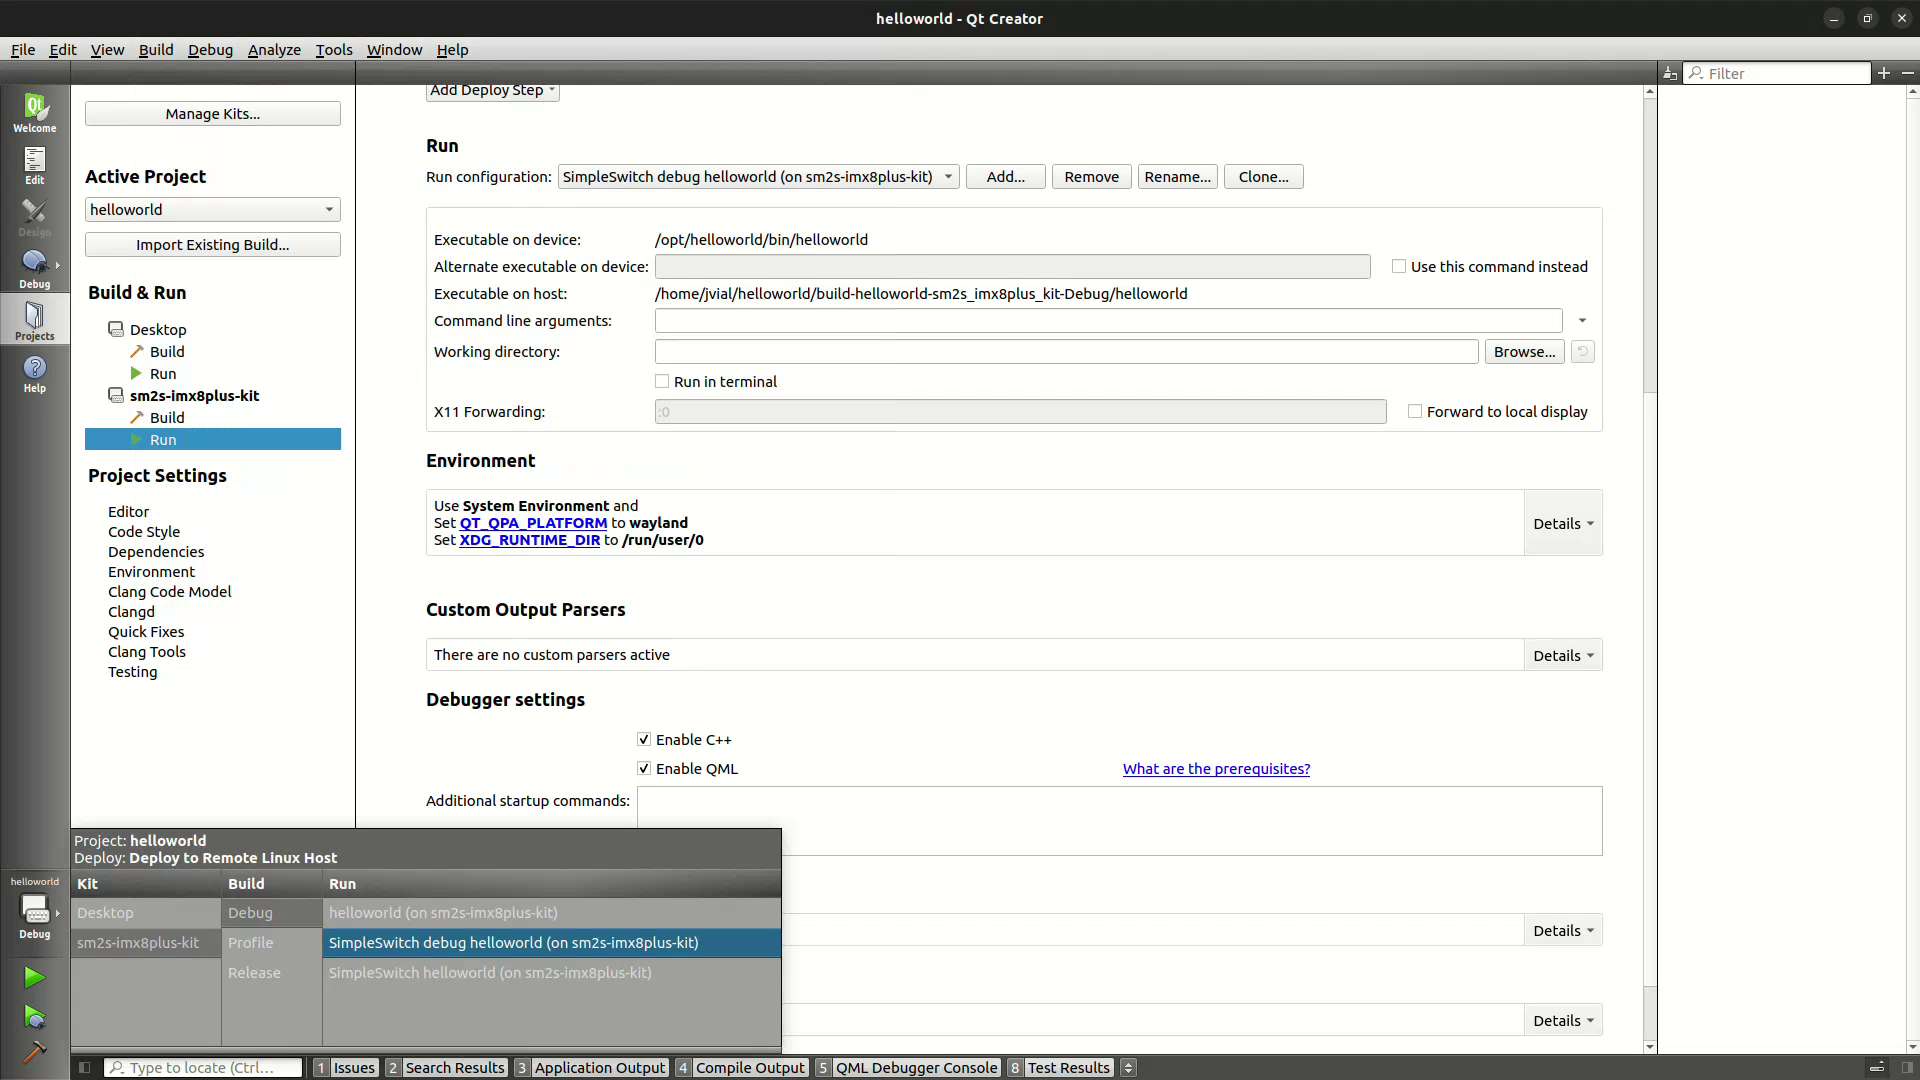
Select the Kit, build mode and run configuration#
Thanks to the menu Build then Open Build and Run Kit Selector.., you
can then select your kit, build mode and run configuration. The two mains set
you should use are:
the debug mode
using the kit you created previously
Debugbuild modethe debug run configuration you created (the one where you set the environment variable)
launching the application thanks to
Start debugging of startup project.
the release mode
using the kit you created previously
Releasebuild modethe release run configuration you created (the one where you set the alternate executable command)
launching the application thanks to
Run
Further reading#
See also